JRubyでFilthyRichClients
半年ほど前にFilthyRichClientsを読んだけど、いろいろ忘れているので復習する。
せっかくなので、JRubyでサンプルコードを書きなおしながら勉強してみる。
まずは、chapter2の楕円とハイライト表示のコードを書いてみよう。
楕円を描く
require 'java'

include_class 'java.awt.Color'
include_class %w( JFrame JComponent SwingUtilities).map{|s| 'javax.swing.' + s}

class OvalComponent < JComponent
  def paintComponent(g)
    g.setColor(getBackground())
    g.fillRect(0, 0, getWidth(), getHeight())
    g.setColor(Color::RED)
    g.fillOval(0, 0, getWidth(), getHeight())
  end
end

SwingUtilities.invokeLater do
  f = JFrame.new
  f.setTitle("OvalComponent")
  f.add(OvalComponent.new)
  f.setDefaultCloseOperation(JFrame::EXIT_ON_CLOSE);
  f.setSize(200, 200);
  f.setVisible(true);
end
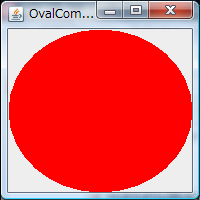
実行結果
JComponentを継承したクラスをつくって、paintComponentをオーバーライドした。
setColorで赤色に設定して、fillOvalで円を描いている。赤い楕円が表示される。

ハイライト表示
JButtonのテキストにハイライトを付ける。
require 'java'

include_class %w( AlphaComposite Color FlowLayout RadialGradientPaint ).map{|s| 'java.awt.' + s}
include_class %w( JFrame JButton SwingUtilities ).map{|s| 'javax.swing.' + s}
include_class 'java.awt.image.BufferedImage'
include_class 'java.awt.geom.Point2D'

class HighlightButton < JButton
  HIGHLIGHT_SIZE = 18

  def initialize(text)
    super(text)
    @highlight_image = create_highlight_image()
  end

  def create_highlight_image
    img = BufferedImage.new(HIGHLIGHT_SIZE, HIGHLIGHT_SIZE, BufferedImage::TYPE_INT_ARGB)
    g = img.createGraphics()

    # 背景
    g.setComposite(AlphaComposite::Clear)
    g.fillRect(0, 0, HIGHLIGHT_SIZE, HIGHLIGHT_SIZE)

    # グラデーションを作成
    g.setComposite(AlphaComposite::SrcOver)
    center = Point2D::Float.new(HIGHLIGHT_SIZE/2, HIGHLIGHT_SIZE/2)
    radius = HIGHLIGHT_SIZE/2.0
    dist = [0.0, 0.85].to_java(:float)
    colors = [Color.white, Color.new(255, 255, 255, 0)].to_java('java.awt.Color'.to_sym)
    paint = RadialGradientPaint.new(center, radius, dist, colors)

    g.setPaint(paint)
    g.fillOval(0, 0, HIGHLIGHT_SIZE, HIGHLIGHT_SIZE);
    g.dispose()
    img
  end

  def paintComponent(g)
    super(g)
    g.drawImage(@highlight_image, getWidth()/4, getHeight()/4, nil)
  end
end

SwingUtilities.invokeLater do
  f = JFrame.new
  f.setTitle("OvalComponent")
  f.getContentPane().setLayout(FlowLayout.new);
  f.add(JButton.new("standard"))
  f.add(HighlightButton.new("highlight"))
  f.setDefaultCloseOperation(JFrame::EXIT_ON_CLOSE);
  f.setSize(100, 100)
  f.setVisible(true);
end
実行結果
JButtonを継承するクラスでpaintComponentをオーバーライドした。
create_highlight_imageの中がごちゃごちゃしてるけど、BufferedImageをつくって、そこにグラデーションを書いています。
paintComponentの中では、まずデフォルトの描画を行い(superの呼び出し)、
そのあとcreate_highlight_imageで作ったImageを描画しています。下のJButtonのほうに、微妙にハイライトが付いている。

RadialGradientPaintをつくるのに、色々とto_javaするのが大変。。。もっと上手な方法あるのかな。